Wednesday 29 December 2010

J's Racing Type-S Aero Kit + Buddy Club Bonnet??

Following up from the aero kit post, I'll go a little more indepth on the merits of the J's kit and some pictures of course!

J's Racing spent over two years developing their kit for the DC5 using aerodynamic data gathered from endurance races and numerous motorsport events. Whilst developing the kit, they also took into account street applications. 
Unlike many other 'aero kit' manufacturers, J's design their kits with performance in mind and not as a 'dress up' part, although their kits do look fantastic! As such, the benefits with the Type-S kit as you would expect are:
  • Increase in downforce
  • Decrease in aerodynamic drag
  • Cooling efficiency
  • Weight saving
 
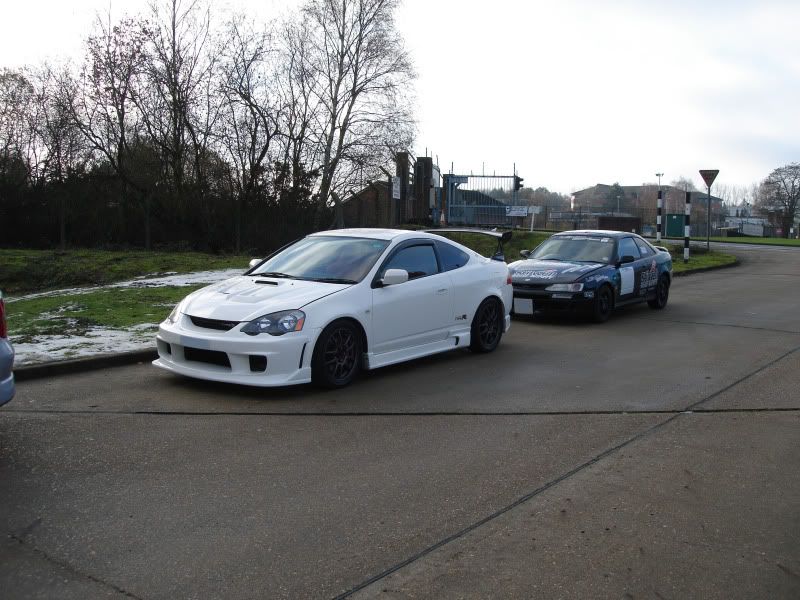
Mine will be the 3rd J's DC5 kit in the country, however if we're being accurate it will actually be the First facelift kit on these shores and will also be the first to have the front wide fenders.
I'll give a brief run down of the parts that make up this kit.

Type S Front Bumper with Carbon Under Panel
When the temperature of cooling water reaches a certain point, in order to avoid possible risks, the ECU will make several changes including fuel increase and retarding the ignition point which will cause a reduction of power. Now a stock bumper with its narrow air opening to the radiator cannot utilise the full capacity of a cooling system even with an aftermarket radiator. The J’s Racing Type S front bumper is designed to significantly increase the airflow to the radiator first by a wider opening and second by closing the gap between the frame and the bumper. The kit reduces the water temperature by approx. 10oC compared to the stock bumper and additionally the carbon fibre underpanel provides increased downforce.

J's Racing front bumper - Notice the wider air opening and large front splitter
My car in OEM form for comparison
Type S Carbon Front Side Wings
By catching the air which goes around the side of the car and by aiding its downward flow, the carbon Front Side Wings produce significantly more downforce. Additionally when used with the J’s Racing front canards, the effectiveness is further increased. This is because the escaped air flow leads to the underside of the canards and creates an increased atmospheric pressure difference at the top and bottom of the canard i.e. Greater downforce in this case.

J's Racing Type S Carbon Fibre Front Side Wings
Type S Carbon Front Canards
The canards creates a strong front downforce which will enable faster corning speeds. It will also produce beter balance between the front and rear when used with the GT wing.

J's Racing Carbon Fibre Front Canard

Front Wide Fender
Recapping back to my CE28's post, I made a comment wishing I had ordered wider front wheels with a lower offset. This is one of the reasons why. To compensate the increased width I will be running Eibach hubcentric Pro spacers at the front to fill the space.

The fender is designed to provides an extra 15mm over the stock fender enabling the use of wider tires for more traction. The duct on the fender streamlines the air turbulence from the wheel spin, which effectively reduces the drag. Note, the J's fender used to be 20mm wider than stock. At the time of my order they reduced this to 15mm. I'm hoping I'll have one of the last manufactured 20mm fenders.

J's Racing 15mm Wider front fender
Type S Side Skirts with Carbon Underpanel
Keeping low pressure underneath the car will enable higher pressure above the car to apply added downforce. By extending the width of the body and significantly reducing the air sucked from both sides, the Type S Side Skirt with Carbon Under Panel is designed to maintain an area of low pressure underneath the car.

J's Racing Side Skirts with Carbon Fibre Under Panel
Type S Rear Bumper with Carbon Canards
The rear bumper is designed to reduce the “parachute” effect (air mass trapped inside the rear bumper increasing drag) by adding several ducts (bumper left and right ducts, and license plate left and right ducts). The new side fin shape structure streamlines the air on the side of the car and works with the diffuser to produce more downforce. The diffuser moves air out from the underside of the car at a faster rate, thus decreasing the air pressure below the car and allowing the slower moving air above the car to push the vehicle into the ground i.e. Increased downforce.

J's Racing Rear Bumper
License Plate Vents

Side Air Vents and Rear Canards
Rear Diffuser
3D GT Wing Type 1 - Wet Carbon
Proven to be very effective in competition, the three dimension (3D) GT wing has become a standard item in the GT Championship Series. In order to maximize the wing area and to minimize the drag, it adopts a 3D banana shape. The 3D GT-Wing produces an overwhelming down-force and balances out the downforce produced at the front. The width of the wing is 1600mm and the wing angle is adjustable in 4 stages. Note, Umemoto San told me they could produce wings of varying widths to accommodate various competition regulations. However this part is a right A$$ to get hold of (they are typically made to order as with most of J's parts), it's one of the two parts I am waiting for that is holding up my project at the moment. Additional note is that First Moulding make the C/F wings and bonnets for J's Racing as well as other prestigious Tuning Companies such as M&M Honda

J's Racing 3D GT Wing
Notice the 'Banana' Shape
Buddy Club Carbon Fibre Bonnet
Yes, I know. Why mix and match the bonnet when you've effectively got the whole J's kit? That thought has repeatedly gone through my mind and still does today. 

Firstly, let's take a look at the two:

J's Racing Type-S Carbon Fibre Bonnet. Note, I do not like the look of the 'Type-V' hood shown in the very first picture of this post so discounted it immediately. Although I am after function, I want it to suit my style as well!
Buddy Club Carbon Fibre Bonnet
Concentrating on form factor, they both benefit the car by having large vents near the exhaust header to release heat from the engine bay. The J's vent appears to be wider than the Buddy Club, however the Buddy Club vent looks to be directly above where the header would sit. Whether one is better than the other at releasing heat I can't comment on, so for me it came down to aesthetics when I made the choice.

Both are very pleasing on the eye, but the Buddy Club in particular is a crowd favourite. This is not the reason for me liking it but explains why I like it. It is an unoffensive/ un-outrageous 'cool' design that goes with everything.

From the picture above, the J's doesn't look as nice, but it really is.


Initially what put me off is it is very aggressive looking. However in saying that the J's Aero kit is an aggressive kit! It definitely has grown on me since not choosing it...  and additionally I can't think of anyone that has this bonnet in the UK, or even the States for that matter. 

However there is also one other factor that comes into play - price. Quite simply, the J's bonnet would be over £1k and then there are extras to buy like the inner protector tray for when it's raining (not a necessity, but for peace of mind); the Buddy Club includes this as part of the package and is significantly cheaper.

In saying all this though, if I could go back in time I would choose the J's bonnet..

Tuesday 28 December 2010

Aero Kit

Now that my blog is up to date I can start writing about the parts I have chosen and ordered, waiting to be fit in the new year. First up on the agenda is the aero kit. I had narrowed it down to three options:
  1. Mugen rear Lip kit and the rest kept OEM
  2. J's Racing Type-S Aero kit (no relation to Honda Type S!!)
  3. J's Racing Type-S Aero kit but with the Mugen rear lip kit
In my opinion, the Mugen rear lip kit provides a fantastic looking rear and should've been the facelift rear by default ;)

Mugen rear lip kit
However, if there is one gripe I have with this lip it's the very nature of what it is, a lip kit. When put on a facelift rear bumper, it doesn't quite sit flush with the rear bumper as it sits on top of the dreaded rear bumper black strip.

The J's kit as mentioned before has always been my favourite kit but the rear hasn't always sat right with me. Functionally you can see why it looks like it does, but there's no getting away from the fact it's a 'marmite' design.


I will hold my hands up and admit I've never really 'loved' the rear and so I was flirting with the idea of combining it with the Mugen rear lip kit. However, as mentioned earlier it's a lip kit and for me would be too chunky for the rest of the J's aero parts. I had also thought about painting the diffuser section of the bumper black to soften the rear design, however as you can see from the below picture, the left and right end diffuser 'fins' (not sure what to call these) are smoothed into the rear bumper, so there is no cut off point for the black paint to end neatly like you have with the Mugen lip kit.


With these conflicting design options in my head, I was at a loss until I came across a time attack DC5 in Australia sponsored by J's.


There was my answer, not far at all from my idea with the diffuser painted black. Just leave the end diffuser fins white!
With just this simple colour coding the J's rear bumper IMO had gone from 'cool but a bit odd' to absolutely stunning! Conundrum over, the J's kit would be the kit.

Monday 27 December 2010

Detailing Products and New Camera

So in preparation for the warmer weather in a couple of months I decided to get a Kestrel DAS-6 Dual Action (DA) Machine Polisher + a whole load of detailing products to go with it. I think I may have gone a little overboard to the point where I even bought a tool bag trolley contrapsion to house all the products...
Why a DA instead of a rotary? Well quite simply I've never used a machine polisher before so I wanted to start off slow and minimalise the risk of burnishing the finish and removing too much paint.

Kestrel DAS-6 Dual Action

When I get round to a proper detailing session i.e. Spending days instead of hours, I'll try and capture each step and give my honest opinion about the products used.

I also bought myself the Sony NEX-5 to capture better shots of the forthcoming show and race season. Yes, I know it won't compare to a DSLR, but then when I was able to get the Sony with the 18-55mm lense for £288.75 brand new, it's a no brainer really. Look on ebay and you'll see why ;)

Sony NEX-5 with 18-55mm lense


Anyway, I took some quick interior pics with the NEX as I'm looking into some interior mods at the moment and needed better visualisation references. Thought I'd share a pic of the DRE lighting up.

Wednesday 22 December 2010

ReelMotion Dyno Day Video

Dave C's video of the dyno day a few weeks back - Love it!

Tuesday 14 December 2010

Interior Carbon Bling

Now, whilst trawling Japan auctions I came across some carbon trim which I had only ever seen once before years ago. No where in the UK or even the States, but in Japan. The reason I had seen this before was because a certain chap although living in Japan, used to be a regular poster on the itr-dc5 forum and of course, as far as I know this trim is only made in Japan (for reasons unbeknowst to me).

The trim in question is a carbon fibre speedometer surround. A very nice touch which I'm surprised no one in the UK or the States has copied circa 9 years! Anyway enough chit chat, here are the pictures.

Awaiting to inspect :)

Close Up
Front
Rear with sticky areas

Tuesday 7 December 2010

Takata Harness

So a good opportunity came up to purchase a 6 point Takata Harness. It's lovely but to be honest, side by side I prefer the Willans...Compulsive buying FAIL (-_-)
I'll decide in the new year what to do..


Monday 6 December 2010

R1R's, RS2's and ad08's

This happened earlier in the year, but better late than never.

I was evaluating tyre reviews in order to decide what rubber my Volks would get. I wanted track/road hybrid tyres, essentially one step down from semi slicks in terms of track performance.

For a long time I was going to go for Hankook RS2's as they had many good reviews and were a decent price.

Hankook RS2

However, it had come to my attention that UK distributors were finally going to bring over Yokohama's new ad08 tyre. I had seen lots of very positive reviews on the ad08's; one in particular stood out - tyre rack review - extreme performance summer tyres. 'Race tyre handling' in my eyes put them above the RE-11's as dry handling appeals to me more than wet (wet handling is the RE-11's trump card + we can't get them in the UK...).
So with many positive ad08 reviews and a price hike of the RS2's at the start of the year it was provisionally decided, my Volk's soles would be a set of Yoko ad08's.

Yokoham ad08

Toyo has always been very popular amongst drivers, in particular their R888 semi slick tyres which are used in UK Time Attack.
They had brought out their R1R track/road tyre which for some reason not many people had tried. As such I wanted to find some reviews on these to see if they were worth considering over the Yoko's.

However, when I saw the first picture of them I was shocked.
For a while now I was under the impression that I had Toyo T1R tyres (road tyre). Thinking about it I can't actually remember checking the make although I'm sure I carried this out (I know this does not make sense).
Seeing a picture of the R1R I recognised them immediately, those were my tyres!

Toyo R1R

My track day at Brands now started to make more sense. Yes, I will still admit the drivers around me were not exactly the fastest around, but when I've got FRSU, uprated brakes and Toyo R1R's on that's quite an upgrade.

I of course proceeded to go outside and double check my tyres and found the answer as to why I hadn't remembered the type. The only lettering I could see on the tyres was "Trampio R1R". You really had to inspect the entire wheel to find 'Toyo' which was in tiny tiny writing. 'Trampio' doesn't really stick in the mind as a tyre model so I must've combined the T and 1R to form T1R....

Having never heard of Toyo Trampio in the UK, it turns out this was the older name plate for Proxy and only available in Japan. This means I probably have one of the last remaining sets of Trampio R1R's around unless someone is stockpiling them ha ha.

Sunday 5 December 2010

Dyno Day @ SRR

So Dave C from Reelmotion organised a K20 dyno day at Surrey Rolling Road (SRR). Great day out as expected and I was a very happy chappy by the end of it.

Dave had told me DC5's in stock form usually produced between 205 to the low 210's on the SRR dyno. Anything above 210 was consider a very healthy engine.

On my final run, my car made 216.6 bhp on 97 ron fuel (I was desperate for fuel on the way to Mallory the week before). The DC5 is tuned to 100 ron, so most owners (including me) run with Shell VPower (99 ron). I was a very happy man. Even Charlie from SRR commented how it was a very good figure for a stock DC5; a healthy engine indeed!

Note: Official Honda figures quote DC5 power output as 217 bhp

My run:


  And dyno graph


Some pictures of the Tegs on the day.


And last but not least I had to post this up as it's one of my all time favourite exhausts - J's Racing 70RR FX. Crazy loud that you could feel the vibrations in your ears.